Making your own Ethernet cables is a valuable skill, and it starts with knowing how to use a crimping tool for RJ45. With a little practice, you can terminate cables to any length and fix damaged connectors yourself. This guide walks through the whole process step by step, using the widely used T568B wiring standard.
What a Crimping Tool Does
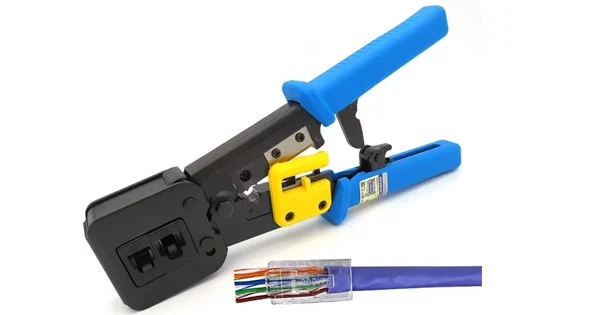
Crimping is the process of physically attaching an RJ45 modular plug to the end of an Ethernet cable. The crimping tool does two things at once: it pushes the connector’s metal pins through the insulation of each wire to make an electrical connection, and it secures the plug’s strain relief onto the cable jacket. Done correctly, this creates a reliable, high-speed connection.
Tools and Materials You Need
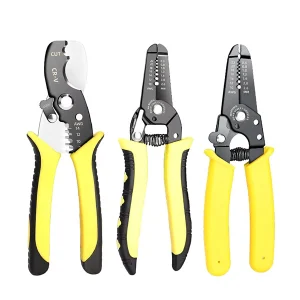
- An RJ45 crimping tool (many include built-in wire cutter and stripper).
- RJ45 connectors matched to your cable (Cat5e, Cat6, etc.).
- Ethernet cable of the right category.
- A cable stripper and cutter (often part of the crimper).
- A cable tester to verify the finished cable.
The T568B Wiring Order
T568B is the most widely used standard in many regions. From pin 1 to pin 8, the order is: Orange/White, Orange, Green/White, Blue, Blue/White, Green, Brown/White, Brown. You can use T568A instead, but both ends of a straight-through (patch) cable must use the same standard. Getting the wire order wrong is the number-one reason cables fail, so this step deserves care.
How to Use a Crimping Tool for RJ45: Step by Step
Step 1: Strip the Outer Jacket
Use the stripper to remove about one inch (roughly 25 mm) of the outer jacket, being careful not to nick the internal wires. This exposes the four twisted pairs.
Step 2: Untwist and Arrange the Wires
Untwist the four pairs and straighten each wire. Arrange them side by side in the T568B order. Keep the untwisting to a minimum — no more than about 1 cm — because over-untwisting increases crosstalk and can limit speed.
Step 3: Trim the Wires Evenly
Holding the wires flat and in order, trim them straight across so they are uniform, leaving about half an inch (roughly 12 mm). A clean, even cut ensures every wire reaches the end of the connector.
Step 4: Insert the Wires Into the Connector
Slide the wires into the RJ45 plug, keeping the order intact. Push firmly until each wire reaches the very end of the connector. Look into the front of the plug to confirm all eight wires are fully seated and still in the correct order.
Step 5: Crimp the Connector
Insert the loaded connector into the crimping tool’s cavity and squeeze the handles firmly until you hear or feel it click. This drives the pins through the wire insulation and secures the plug to the cable jacket.
Step 6: Repeat and Test
Repeat the process on the other end using the same standard for a straight-through cable. Then verify the finished cable with a network cable tester to confirm continuity and correct wiring order.
Pass-Through vs Standard RJ45 Connectors
Two styles of RJ45 plug affect how you crimp. With a standard connector, the wires must be trimmed to exactly the right length so they reach the end of the plug without overshooting, which takes a little practice to get consistent. With a pass-through (feed-through) connector, the wires are pushed all the way through and out the front of the plug, so you can verify the order easily before crimping; a pass-through crimping tool then cuts the excess flush as it crimps. Pass-through connectors are more forgiving for beginners because they remove the guesswork about wire length, but they require a compatible crimper. Whichever you use, the fundamentals are the same: correct order, wires fully seated, jacket crimped for strain relief, and a test at the end to confirm the result.
Straight-Through vs Crossover Cables
The wiring you choose determines the cable type. A straight-through (patch) cable uses the same standard at both ends and is used to connect a device to a switch or router — the everyday cable. A crossover cable uses T568A on one end and T568B on the other, historically used to connect two similar devices directly, such as two computers, without a switch. Most modern equipment auto-detects, so straight-through is what you will make most often.
Common Crimping Mistakes to Avoid
| Mistake | Result | Fix |
| Wrong wire order | Cable fails or won’t connect | Double-check against T568B before inserting |
| Wires not fully inserted | Open circuit; intermittent link | Push until every wire reaches the tip |
| Jacket not inside the plug | No strain relief; wires pull out | Strip so the jacket is crimped by the plug |
| Over-untwisting pairs | Crosstalk; reduced speed | Untwist no more than about 1 cm |
| Nicked wires when stripping | Broken conductor | Use an Ethernet-rated stripper carefully |
Practice Makes Reliable Crimps
Crimping is a hands-on skill, and a few habits speed up the learning curve. Work on a flat surface where you can lay the wires out and keep them in order while you trim. Cut the wires in a single straight pass so they are perfectly even, since staggered ends are the usual reason a wire fails to reach the connector’s tip. Before crimping, always look into the front of the plug to confirm every wire is seated against the end and still in the right order — this two-second check prevents most failures. Keep a few spare connectors on hand, because a mis-loaded plug cannot be reused and it is faster to start fresh than to fight a bad one. And always finish by testing; a cable that looks perfect can still hide a split pair that only a tester will catch.
Tips for Cat6 and Shielded Cable
Higher categories need extra care. Cat6 and Cat6a have tighter twists and thicker conductors, so preserve the twists as close to the plug as possible and use connectors rated for the category. For shielded (STP) Cat6a/Cat7, use shielded RJ45 plugs and connect the cable’s shield to the plug’s metal shell to block interference. A crimper with adjustable pressure helps ensure the contacts fully penetrate thicker conductors.
Get the Right Termination Tools
Quality tools make crimping faster and more reliable. Aevumix supplies crimping tools, cable strippers, and termination tools for copper networks, alongside a full range of fiber optic tools — cleavers, strippers, and termination kits — and test equipment. If you would like help choosing the right crimping and termination tools, contact our team.
FAQs
How Do You Use a Crimping Tool for RJ45?
Strip about an inch of jacket, arrange the wires in T568B order, trim them evenly to about half an inch, insert them fully into the RJ45 plug, then squeeze the crimping tool until it clicks. Repeat on the other end and test the cable.
What Wiring Order Should I Use?
T568B is the most common: Orange/White, Orange, Green/White, Blue, Blue/White, Green, Brown/White, Brown. T568A also works — just make sure both ends of a straight-through cable use the same standard.
Why Does My Crimped Cable Not Work?
Most often the wire order is wrong or a wire is not fully inserted. Re-check the order against T568B, confirm every wire reaches the tip of the plug, and make sure the jacket is crimped inside the connector for strain relief.
How Much Jacket Should I Strip?
About one inch of outer jacket to expose and arrange the pairs, then trim the wires so roughly half an inch remains before inserting. Keep untwisting under about 1 cm to limit crosstalk.
Do I Need to Test the Cable After Crimping?
Yes. Use a network cable tester to verify continuity and correct wiring order. Testing confirms the crimp succeeded before you rely on the cable.